**Some of the links on this page are affiliate links, meaning Session 0 Studios has an affiliate relationship with the provider of the given product. That said, all the products present are present because we have used them and would recommend them**
Playing Dungeons and Dragons with minis is one of the best ways to make combat unique for each player & to help immerse the players completely. Obtaining minis for your games can be difficult and time-consuming, but for many of us, it can also be the gateway to another fun hobby, 3d Printing. In this article, let’s take a beginner’s look into how to 3d Print D&D miniatures for use in your games.
To give you a better idea, let’s walk through the process specifically. Let’s take a race car. Lay the race car flat on a surface and just examine it. Let’s say we want to 3D print this. Now, let’s say we cut the racecar into evenly spaced layers all about 2 millimeters thick. Now, let’s take all of those layers and lay them down one by one, gluing them together. Theoretically, this is exactly how a 3D printer works.
To print D&D minis correctly, you’ll obviously need to understand what 3d Printing is at all. 3D printing is where a machine prints a 3D object on an XYZ grid by creating layers of material repeatedly from the build plate. It literally prints in 3D, pretty self-explanatory right? Nowadays, there are tons of methods for 3d Printing and tons of materials that you can use. There have even been houses 3D printed out of cement.
Before you buy your own 3D printer, you should consider whether or not 3D printing is for you. You should also consider if you have a space set up for it. There are different types of printers and some involve toxic chemicals that could be harmful to yourself or loved ones.
So, let’s think about whether or not 3D printing is the right choice for your D&D gameplay.
With these questions swirling about your mind, you’ll be able to decide whether or not printing D&D minis or getting started into printing is really what you want to be doing.
There are at least 7 types of 3D printing methods, but when it comes to 3D printing for D&D minis, there are really only 2 common types that most people use; FDM (Fused deposition modeling) and Resing Printing (Vat Polymerization). With these two methods, you can print just about any mini or terrain piece you would ever need for your D&D games. But the two methods have their pros and cons. I currently have a Voxelab Aquila (an entry-level FDM printer that is a sort of knock-off of the Creality Ender 3, I don’t think they make it anymore), and I have access to an Anycubic Photon Mon thanks to my brother storing it at my house and letting me use it. The former is an FDM printer and the latter is a Resin printer.
From my experience, there are pros and cons to both. The avid gamer/printer will likely have both and will probably have better models than I do. The models I have are among the most affordable you can get. That said, I think my experience will allow me to shed some light on which one you need.
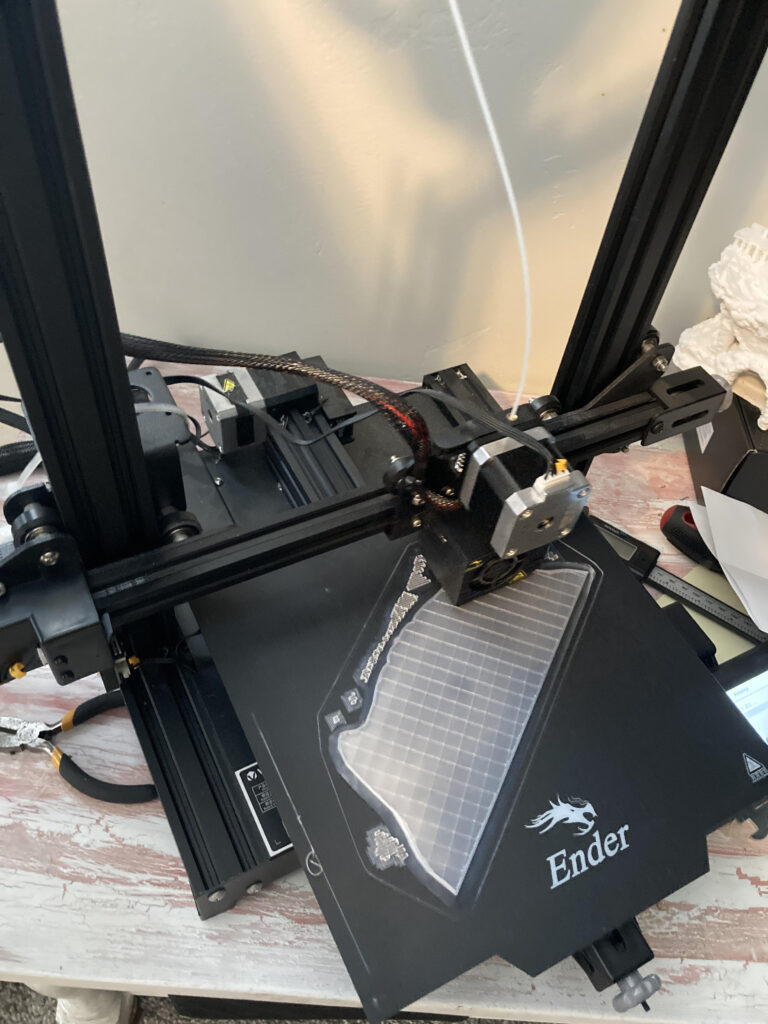
FDM printers are probably what you’ve most often seen. Sometimes you might see someone printing toys and selling them at your local farmer’s market or in a mall somewhere. The basic idea of this printer is that it extrudes material to make the layers that make up the 3D print. All 3D printers work with an XYZ axis. On an FDM printer, usually, it is the Z axis that moves up from the build plate.
FDM printers work with filament. There are different kinds of filament (PLA, ABS, PETG, and more), but since PLA is the most basic (and probably the cheapest) we’ll just talk about that today. PLA is your most standard type of plastic. I generally get the Overture Link from Amazon.
I first got my FDM printer as a Christmas gift and I have loved it ever since. So let’s talk about the pros and cons.

Now that we’ve gotten the basics of 3D printing down and understood we can get into the actual printing of the minis. 3D printing, as we’ve discussed, is not rocket science (though when you are bed leveling, it can certainly feel that way). There are not that many steps.
The first step to 3D printing minis for D&D is finding the files that you want to print. Because we are working with digital technology, the printers parse the object you want to print from a file of data. That file is called an STL file (or stereolithography file). This file tells your computer the information it needs to display a 3D object when you open the file in software that can read it.
To find an STL file that you want to print, you can either purchase the file or find a free file online. I have 2 websites that are my absolute favorite when it comes to finding STL files. I’ve found both paid files and free files on these sites. They are Thingiverse and MyMiniFactory.
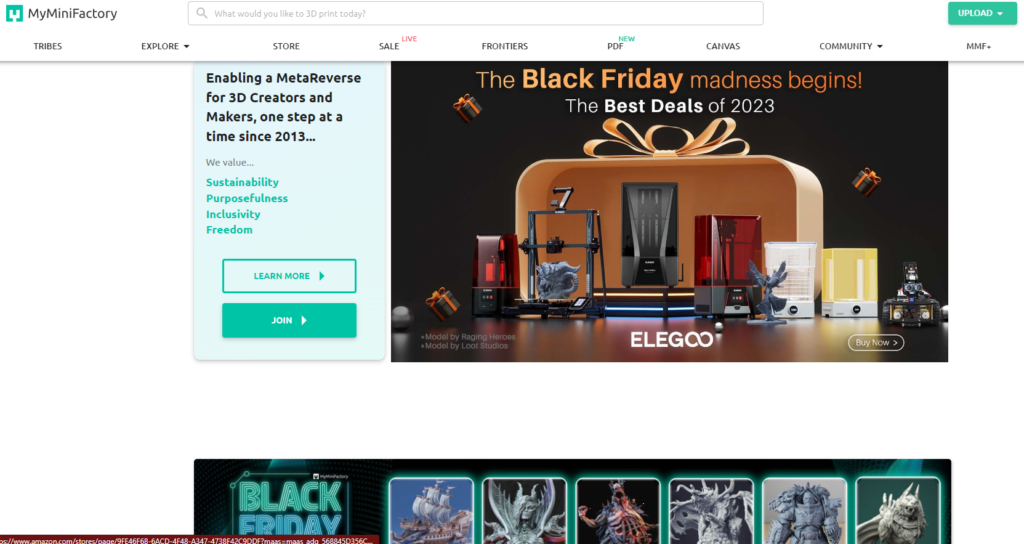
There are a couple of things to remember when you go to these sites for minis. First, you need to get really good at using the search and filter options. On MyMiniFactory, there are some great filters off to the left of the main search section that allow you to really hone in on what you want. Specifically, the Free filter is very useful. Second, you need to be aware of the different copyright symbols that you may find on these files. Some symbols allow you to use the file in a commercial way, other symbols prohibit you from doing so. If you are just playing a fun game at home with friends, then you don’t need to worry about this as much. If you are trying to start a business like we did, you need to pay close attention to this.
Because there are so many free STL files out there, and you may buy even more, you’ll likely want some storage. It’s handy to have an external hard drive available, or you could store files on the cloud. Either way, put them in a safe place that you organize so it’s easy to navigate. Believe me, nothing is more frustrating than looking for an STL file and not being able to find it.
Now you have to slice your files. Slicing simply means taking the STL file and converting it to a file type that your 3D printer can understand. While the STL file shows the data for a 3D object, the files your printers need show instructions to your printer on how to print that 3D object, which is very different. For 3D printers, the file type is called a G-Code file, which gives the printer precise instructions on how to move their parts up, down, left, right, backward, and forward.
To slice your STL files you need to download a Slicer to your computer. Luckily, most slicers have a free version that you can download. It’s also fortunate that there are so many slicers out there as well, so you can really take your pick of the lot of them.
In my case, I use Chitubox for resin printing and Prusa for FDM printing. I use 2 different slicers because I’ve found that each excels in its own right for the respective type of printing. You could however use 1 slicer for both, it’s completely up to you though.
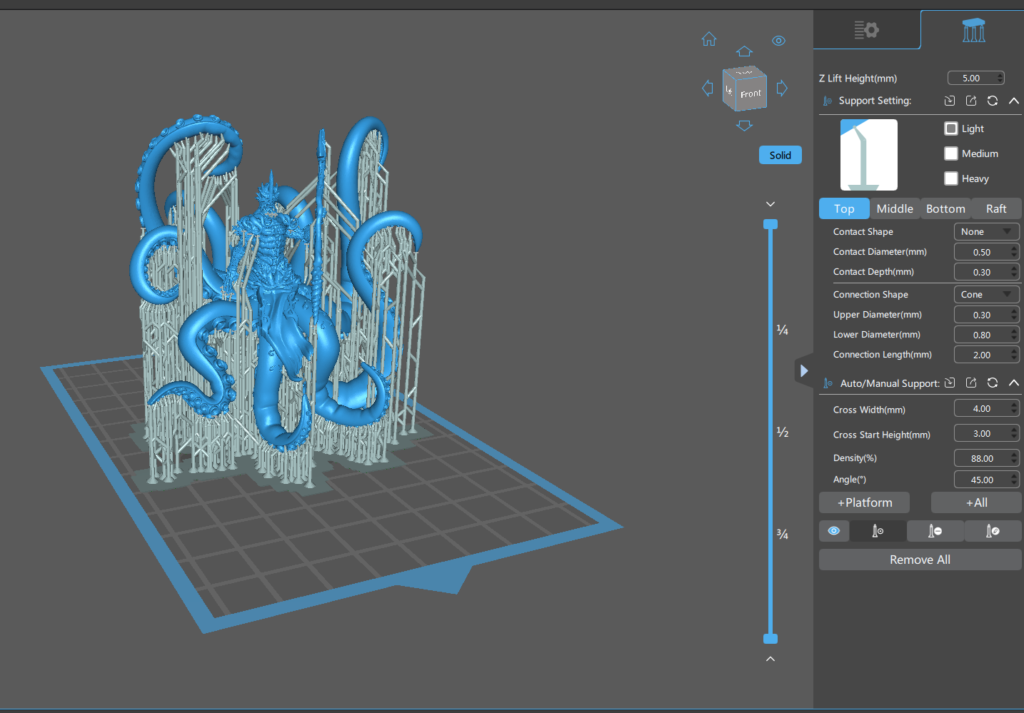
When you download your slicer, you will need to set it up to have the right settings for your specific type of printer. There are numerous videos on YouTube showing you how to set up your slicer and make sure you have the right settings, so I won’t go into that here. The one thing I will say is that 3D printing is all about fine-tuning adjustments. If you change one particular setting way too much, it can make everything in your print go off-kilter. So when printing, change settings very slowly, printing in between. I know this is a very tedious process, but we are working with very detailed things here. It’s better to spend a lot of time getting it right than a lot of time constantly getting it wrong.
The next thing you need to do is prepare your printer. For all printers, this means that you get the sliced STL file to your printer. If you are connected to the printer from your computer or your printer is connected to the cloud then this process is easy, just send it. If you have to use a thumb drive or an SD card to transfer the file, the process is still easy, just remember to remove or insert the thumb drive or SD card from or to your printer when the printer is turned off. This is the best way to make sure things don’t get messed up.
Next, let’s talk about prep for the FDM printer. You’ll have to choose the right type of filament and make sure that your hot end is correctly loaded. Most printers have Load and Unload options in the settings. This heats up the hot end and then pushes through a good amount of filament to make sure that everything is ready as far as the filament coming out is concerned. After you do that, make sure your bed is level, and then heat everything up. What I mean by this is usually there is a setting to pre-heat your hot-end and your bed so that when you hit print, you don’t have to wait as long for everything to heat up. Now you are ready.
Let’s switch over to resin real quick.
With resin, you’ll need to make sure your resin vat is clean and then pour in some resin. Ensure the resin is mixed up, but don’t shake it too much, otherwise, you’ll get bubbles. Instead, try swirling the resin bottle before pouring it.
When you slice your STL file, your resin printer should tell you how many ML of resin you will need. Pour in a little more than what you need for the print. A mistake I made when I first started printing was filling the vat up completely. This is not something that you want to do. When the print bed lowers into the resin vat, it displaces some liquid. If the vat is less than full, you won’t have to worry about this, but if the vat is full, then the resin will spill over. That’s a big mess you want to avoid because it’s a hassle to clean up, and it can also leak under your resin vat and cure against the LED screen. That’s no fun to fix.

Now that you have prepared everything, you are ready to print. So both for Resin and FDM printing, simply navigate to the file you want to print and then hit print.
It is that easy.
There are a couple of things you’ll likely want to do though.
For FDM printing, you want to watch and make sure the first layer gets printed well. If the first layer is messed up, then the rest of the print will likely not work out. If you are really good and quick, you can actually level the bed a little more while it is printing the first layer. I would caution against this if you are starting out because it is very easy to make the whole thing become unbalanced. If you do try this, I would recommend that you lean towards having the print bed too far away from the hot end rather than too close. This will make it so the filament doesn’t just get stuck inside the hot end.
For Resin printing, you can’t really do this as the first few layers will be hidden from your view. You’re sort of stuck with it for the long haul. That’s fine because, for the most part, Resin is generally faster than FDM so you won’t have to wait long.
The next thing you may want to do is watch the print be printed!
Honestly, when I got my first 3D printer, it was as a birthday present. My birthday is in December and I’m lucky enough to be able to take my birthday off to Christmas. At that time, I sat and watched the magic of my FDM printer create wonderful things… until the hot end got all gummed up and I had to replace it. Watching a 3D printer make something seemingly out of nothing is, as I said, magical.
Now that your printer has printed the thing without issue (hopefully), you’ll want to do some post-processing.
Let’s talk about resin prints first.
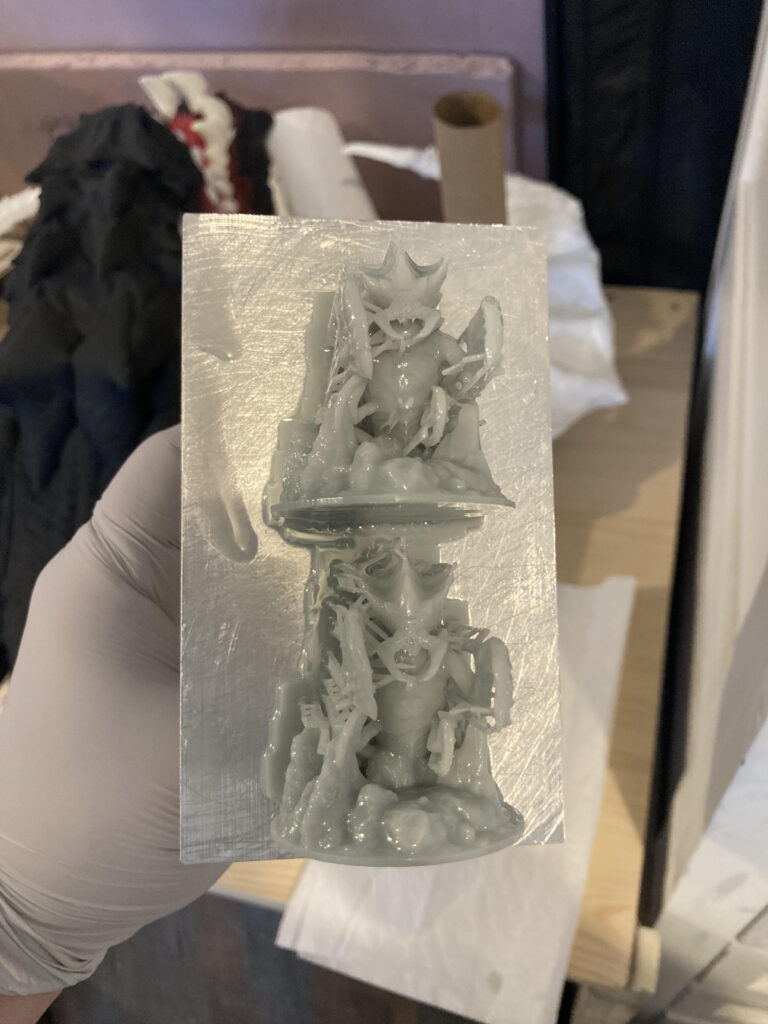
For the resin prints, you’ll need to wash the print, remove the supports of the print, and then cure the print. If you wanted to you could remove the supports off first and then wash it. In my experience, the washing process can break small pieces off and I’ve found that leaving the supports on gives a small layer of protection.
So to wash your prints, dunk them in the washing solution, either water or Isopropyl alcohol and then let your washing station go to town. If you don’t have a mechanical washing station, just scrub it up. In this case, removing the supports would be a good idea.
Then, after it is done and you want to remove the supports, let me just say, it’s worth it to take your time. Breaking a piece off of the actual print is no fun. Getting some nippers, or some dental tools can help a lot. Also, making sure the supports are well placed in the slicer goes a long way. Another pro tip, make sure to wear Eye protection as sometimes small pieces can shoot off. Believe me when I say from experience, getting something in your eye is stress you don’t need. I’ve had glass in my eye, and yes even a small piece of uncured resin. Not a peaceful moment.
After the supports are off, you will want to grab an old toothbrush and then dunk the non-supported print in the washing solution again and scrub it a little more. This gives the prints a nice matte finish which looks a little nicer.
Then put it on the curer and cure it. As far as I’ve found, the best time is 5-10 minutes. Then I like to let my prints just sit out for a bit just to make sure any residual resin is fully cured.
Now, for FDM prints, the post-processing can be more simple or more complex. If you want, you can just leave the print as it is. That’s totally fine. In most cases, especially if you are printing minis, you may want to do something about the layer lines. The hard part with minis is that anything you do to get rid of the layer lines will also likely get rid of a lot of the detail on the mini, so my recommendation with the minis is not to do much post-processing and instead just leave them, or at the most give them a base coat of paint with a normal spray paint primer. Don’t use the special primers made for minis because that will maintain a lot of the detail, including the layer lines.
If you do want to mess with the layer lines, you can try a heat gun or blow dryer, some basic solvents, or sandpaper. For larger pieces it’s a lot safer a practice because you won’t accidentally melt your entire piece like you might with a mini, so beware.
Obviously, you’ll also want to pull off any supports that you used. When doing this, be very careful as supports for FDM prints do not come off as easily as they do for resin prints in my experience.
So now that you know how to 3D print miniatures for D&D, have at it!
I hope this article helped you out and gave you ideas on how to make the hobby easier and more fun. If you have any suggestions to add to this article, feel free to let me know in the comments.